The world map interface; the party is currently traveling overland on Poko Kohara.
Pillars of Eternity II: Deadfire world map covers the Deadfire Archipelago and the islands that cover it. It's distinct from the previous game in that you use a ship, The Defiant, to travel across the map, explore, and run into various random encounters.
- To avoid bandwidth overconsumption, the interactive map is found here.
Travel
The key difference between the first game and the second is the fact that travel is much more involved and requires resources. As your ship crosses the archipelago, you need to watch your reserves of cash, food, and water to avoid mutiny, starvation, dehydration, and as a consequence, losing your crew, health, and/or life. Finding the optimal route across the waters of the Archipelago while exploring is a core part of gameplay.
Thankfully, once you make landfall - at a port or a bay - your crew is smart enough to forage for food on their own. As long as you stay on land, you only have to pay your crew's wages, without worrying about food.
Locations
Exploration
There are many types of areas that can be found beside marked locations, each of which can be looted or explored.
| Name | Type | Notes |
|---|---|---|
|
Misc | Landing point to transition from sea to land-based exploration (and vice versa). |
Derelict Ship |
Scripted encounter | You may be attacked by a ship afterwards, as they assume you're looters or pirates. |
Plague Ship |
Scripted encounter | A ship affected by a plague, you can sink them from afar, or come closer/use a Spyglass to examine them. If the ship is empty, you can salvage it.
Otherwise, you can rob the plagued sailors or provide them with remedy for their crew. Robbing the ship will net you a collection of cargo, a random item (each different ship will give you a different item) as well as +5 Morale. Helping the crew requires a non-Wilder surgeon (no rank required), -5 Medicine, and will give you -5 Morale and the random item, assuming you accept it). In any case you will get 180 experience and 2 Sailor Experience. In boarding their ship, or helping them, you may also contract the plague. |
Farm |
Merchant | Offers foodstuffs and drink
A solitary rice farm. It looks bountiful enough to welcome trade. |
Fishing Village |
Merchant | Offers foodstuffs and drink. One is located near Osa Channel.
This small fishing village looks prosperous enough to welcome trade with outsiders and locals alike. |
Millhouse |
Merchant | Offers foodstuffs and drink. One is located northwest of Hasongo.
This millhouse doubles as a stopping ground for travelers and traders to rest their weary legs. |
Rice Farm |
Merchant | Offers rice and rice-based drinks, plus Taar Loaf
A solitary rice farm. It looks bountiful enough to welcome trade. |
Orchard |
Merchant | Offers Koīki Fruit, Khapa Leaf, Khapa Tea and Water. One is located on the islands near Ofecchia Channel.
An orchard bustling with koīki trees. Doubtless a good spot for exchanging food and other goods. |
Vailian Mill |
Merchant | Offers foodstuffs and drink
A Vailian mill. Such sites are convenient meeting places for merchants. |
Abandoned Village |
Lootable | Randomly chosen loot, primarily crafting ingredients and food. Low chance of finding Nature's Embrace or Boots of the White.
Between failed settlements and discarded Huana villages, the Deadfire islands are spotted with promising ruins. |
Burial Mound |
Lootable | Randomly chosen loot, primarily valuables. Each search takes several hours until the location is searched.
Huana tribes traditionally heap their dead onto pyres or give their bodies to the deep sea, but mounds like these suggest that rangas of honor, wealth, and distinction were buried nearby. |
Old Battleground |
Lootable | Randomly chosen loot, primarily ship supplies. Each search takes several hours until the location is searched.
It isn't always easy to judge who fought or why, but what belongings the dead leave behind is a legacy that anyone can claim. |
Ruined Tower |
Lootable | Randomly chosen loot, primarily ingredients and adventuring gear. Each search takes several hours until the location is searched.
This fragment of a fallen keep stands like a monument to ruin and a beacon for plunder. |
Shipwreck |
Lootable | Randomly chosen loot, primarily ship supplies. Each search takes several hours until the location is searched. Low chance of finding a Dragon Pendant.
Waves batter a splintered hull that doggedly refuses to sink. Whoever abandoned this may have left something behind. |
Abandoned Camp |
Lootable | Random amount of low-level food |
Fruit Trees |
Lootable | Random amount of fresh fruit |
Oasis |
Lootable | Random amount of water |
Player-nameable locations

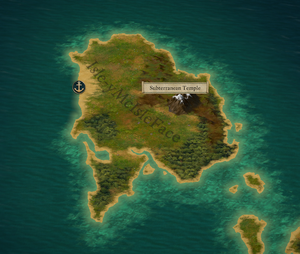
An example of a renamed island
Upon clearing the following locations, you can choose to name the island they belong to. This places a large label on the island with the name you inputted.
- Cavern of Xaur Tuk-Tuk
- Temple of Tangaloa Ruins
- Forgotten Catacomb
- Subterranean Temple
- Flooded Cave
- Hall of the Unseen
- Ruins of Amira's Roost
- Sandswept Ruins
- Collapsed Coal Mine
- Kohopa's Fang
- Cave of Threshing
- Outcast's Respite
Notes
- The map covers a square area stretching from ~9 deg 55' N 30 deg 7' E to ~39 deg 49' S 69 deg 57' E (approximately 40 by 50 degrees).
- Assuming equivalence with Earth's dimensions, a degree corresponds to 69 miles (111 kilometers), that's a square with an edge length of 2 760 miles or 4 440 kilometers, covering 8 517 600 square miles or 24 642 000 square kilometers.
- Assuming Eora has Earth's proportions, Eora has 154 256 400 square miles or 399 200 400 square kilometers of area and Deadfire represents a little over 6% of its total area.
- The ID of the world map when using the console command
AreaTransitionis "FreeWorldMap", and "FreeWorldMapBackerBeta" for the Backer Beta map. - Developer testing areas include "ar_0002_vfx_test" and "combat_test_poe2".